
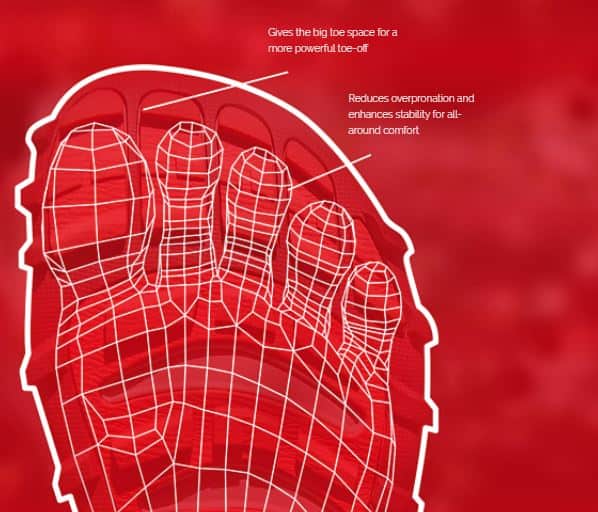
Cycling shoes that can be found in stores today are usually standard – similar-sized toe box, the same range for clear adjustment, etc. Those who have wider feet often go above and beyond to find a cycling shoe that can accommodate their wide feet. Cycling shoes that can fit wider feet have a larger “shoebox” portion so that its size is identical to the width of the remaining shoe. This will ensure that your toes are not squished – allowing you to carry on without any cursing or cringing. With the absence of any sort of rolling movement, mountain bike shoes do need any surplus space at their front end. Cycling shoes that are usually longer cannot facilitate easy cleat mounting, bringing down efficient power transfer from the pedals. The only portion of a cycling shoe that requires some extra space is in front of your big toe. This is the reason why insoles are usually longer than actual cycling shoe length. With the right size, you can get a snug fit, transfer power more efficiently, and have a wiggle room that ranges between 0.5 and 1 cm. No matter how far you travel, this toe room is crucial for a comfortable fit.
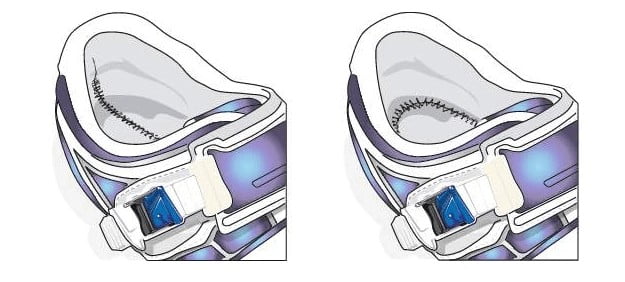
If the front end of your cycling shoe and your big toe are touching while you are in a standing position, it means the shoe is too small for you. Similarly, contact between the toes and front end of your shoe as you get up means you need to go for a larger size. As you lift your heels If when you lift your heels there is a gap between your foot and the shoe, they are too large. You want enough room to wiggle your toes. Also, you can make modifications to the synthetic-made uppers portion. This way, there will be more room for your toes. You can also consider cutting a hole along the toe, this will enable your bigger toes to have more space.
With the distinctive profiles for men and women, women-specific cycling shoes come with a wider toe box (???). This is accompanied by a unique attachment system that runs towards the toes. A minimum of 3 straps can be used on the shoe to fit a wide forefoot.
1. First & foremost, a user should think about his/ her feet
To get your next cycling shoe pair, take a step back and dedicate some time to get familiar with your feet profile. As you have an idea about the shape of your arch and foot, you are more likely to end up with a pair that will keep your feet comfortable. You can follow the steps outlined below to get a “template” for your foot.
2. Foot guide:
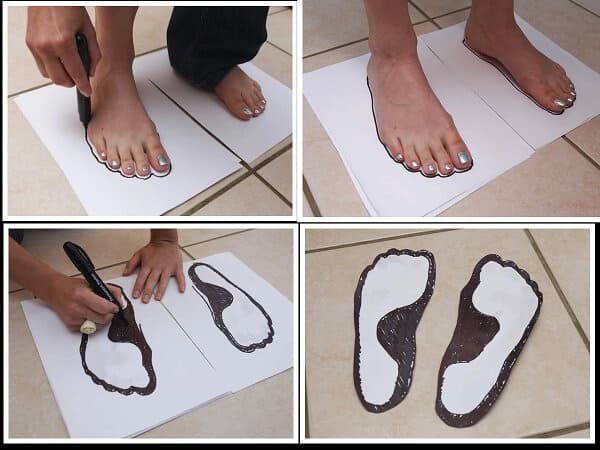
- Drawing the feet on a piece of paper: While standing on white paper barefoot, engage in some marches while being fixated on the papers until you become still. Now you will need to bend over to outline your feet.
- Get your feet wet & step on the pre-drawn outline: Use any means to get some water on your feet and climb into the outline you drew in the step above. Without lifting your heels, squat. Finally, get off the papers.
- Make sure to put in some color to the dry area on the paper: If you have done the above steps correctly, a good impression of your feet should be left where your “wet” arch can be noticed better. Use any color to fill in dry areas of the outline.
- Cut out the shape & let it dry!
The template will be helpful whenever you want to purchase a pair of shoes for cycling, running, or any other activity.
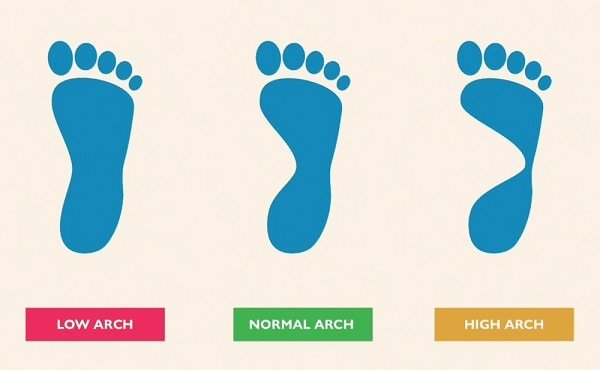
3. Most common types of foot & arch types.
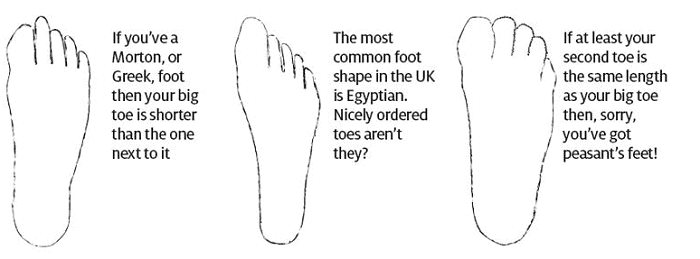
From the 3 foot shapes that you can see in the picture above, the most common shape would be Egyptian, which is characterized by toes that are ordered nicely. If your big toe is short in comparison to the immediate one – your feet are shaped Greek / Morton. Peasant foot shapes have the same size for the big toe and any of the other toes on your particular foot, the minimum requirement is the second toe.
- Flat feet: Flat arches are common on individuals who have their foot motion and ankle bones leaned in the direction of the arch. For flat feet, shoes that have an elevated front end are ideal so that the toes are not squashed. With wider cycling shoes, there is more room for the toes to spread out. This minimizes pressure sustained by the foot’s front end, preventing bunions and pain. Additionally, a shoe that is equipped with a firm sole and support for the heel will stop it from rolling inwards.
- Normal arch: Normal foot arch is characterized by slight elevation from the ground level when the individual is bearing beating weight. A quick way to test this would be to slip a piece of paper under the arch of your foot. If you can do so, then your feet are arched normally.
- High arch: High arches are exactly how they sound like – the feet arch is raised abnormally, leaving a significant gap between the arch of your feet and the floor. Going with supportive insoles is better for such arches.
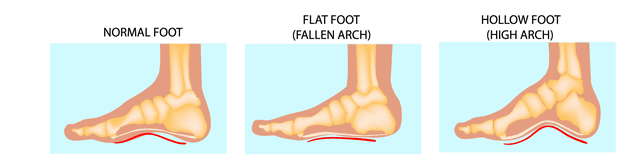
Credit: Gotham Footcare
4. The functional choice of the footwear
- Multi-purpose: By multi-purpose, we are referring to instances when you may get off your bike while facing a red traffic light during commuting. You will therefore be walking in cycling shoes now. This is why shoes designed for mountain biking and casual purposes should use cleats that have been attached to the shoe’s sole. A typical road-bike cycling shoe is durable, which often means extra cost. If you go for a single pair, stiff shoes should be preferred as they will allow you to remain efficient and also make walking more comfortable than before.
- Specific purpose: With racing or road training shoes, you cannot comment on its flexibility just by hand touch. With extended riding on grubby roads – using separate pairs for the two purposes will be more cost-effective. If we look at things long-term – cycling shoes that cost more will last you longer while a less – expensive option will save you until it has no use.
5. Comparing your foot template w/ the shoes you want to get.
- Make a comparison of the foot template with shoe shape.
If your feet are shaped Egyptian, you cannot use cycling shoes that make the feet of the riders similar to what we can see in the Greek shape. With Peasant’s foot, the toe-box on your cycling shoes should take up a wider area
- Ensure the feeling inside, right along with the last of the shoe.
As you check inside your cycling shoe, you are checking if it feels curved or flatter.
- If your feet are arched high and rigid, we know this as Cavus foot. With a “curved last“, you will be able to maintain your usual posture while pedaling harder. This will also reduce your risk of developing arch pains.
- Planus foot will not do well with a curved last. Semi-curved or flat last will be more comfortable.
- Rectus foot is most common, with many manufacturers providing lasts that are designed with a semi-curved profile.
6. Ensuring that your cycling shoes fit well
- Step 1
Depending on the type of bike you are using and your riding purpose, set up your mind for the type of cycling shoes you want to get. Mountain bike shoes have cleats that are recessed so that you can use the same shoe for cycling and off the bike walking. This design can be used with commuter bikes too. Protruding cleats are seen on road bikes so that during the short duration of the rides, you can be comfortable and can deliver power from the pedals more efficiently.
- Step 2
To measure your foot, specialists suggest late afternoons since at this time of the day your feet have the largest size. It will be less hectic if you can visit a shop that has specialized personnel to deal with your queries.
- Step 3
Ask the personnel at the store for your foot size. Pay attention to whether the shoes are using European or American scales for measurement.
- Step 4
Do not hesitate to try out as many pairs as needed to find the perfect cycling shoe. Look out for the model that keeps your feet snug and comfortable. If the shoes feel stiff, it is probably due to the rigid sole found on new cycling shoes. As they stretch very little or not at all, you have to be sure and true about the comfort level.
- Step 5
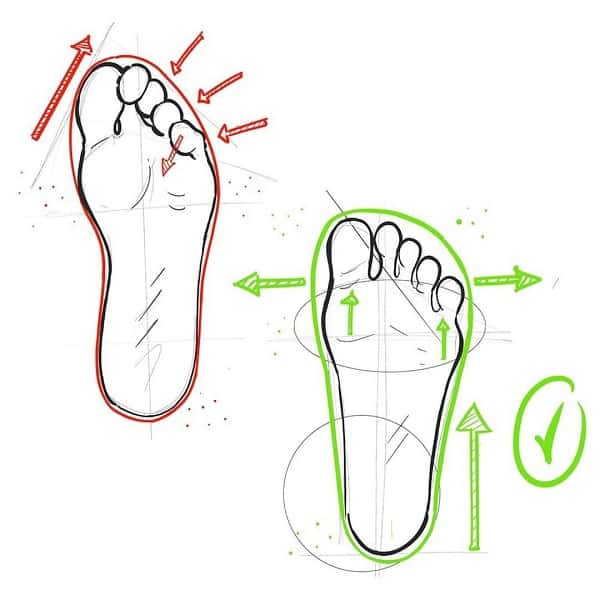
As you are trying out each shoe, stand up on them if you are confident about the fit. At this point, you should find that your big toe and the farthest end of the shoe are far apart by a distance, not more than 0.5 inches. While you should not have too much freedom to wiggle your toes freely, your toes will need to stay apart from the shoe’s front end.
- Step 6
Take a short walk while you are wearing shoes. If you notice minimal movement at the heel, this is acceptable. If your feet are slipping constantly on any shoe, do not opt for it as there is a high chance you will get blisters due to long term use.
- Step 7
Look for a chair or a bench on which you can sit and imitate aggressive pedaling. Make sure you can press in an outward direction with your legs fully flexed. Follow this up by moving your feet in a downward direction as the legs return. This is similar to sweeping something from your toes. As you complete this motion, you may be able to guess how the shoe will feel out on the road. If you experience any slippage or punching as you mimic, that particular shoe is not for you.
- Step 8
Look at other comfort features on the cycling shoe. The insole should have enough thickness to keep your feet comfortable while the fasteners should generate any soreness or numbness. To finish things off, check for seams that may irritate your feet.
7. The importance of a proper fit of cycling shoes.
Newcomers to cycling are often naive to use training shoes for cycling too. If that is not the case, there is also a tendency to go for a bigger size – like training shoes again. For a better-looking fit, some even go for narrower shoes despite having wide feet. These will bring up complications with the shoe’s cleat positioning.
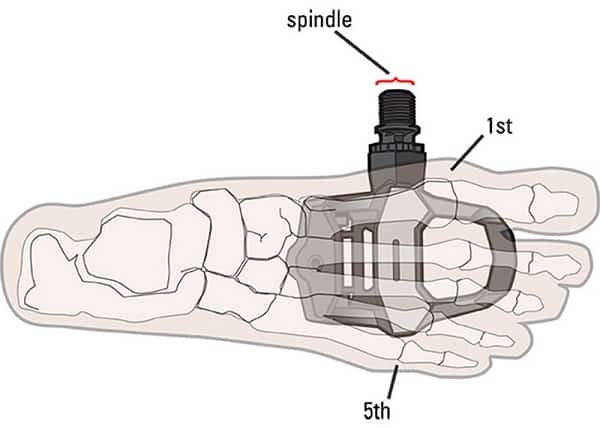
Fore/aft placement of the cleat is a key factor because this determines which portion of the rider’s foot is loading up as he or she pedals harder. With the cleat more towards the front end of the shoe, the toes of the rider are being loaded. This will lead to inefficient pedaling and strain the muscles in your lower leg. The best position for the cleat is such that the axle of the bike’s pedal should be under the 1st and 2nd metatarsals – or just below the ball of the foot, in more simple words. This norm is followed by shoe manufacturers on their designs too, as we can find holes for the cleat aligned almost perfectly with the ball on the feet of cyclists. With bigger shoe sizes – cleat holes are too forward. This makes it difficult for the rider to find the optimal position for the cleat.
Humans are designed with feet that have various proportions. So if you have longer toes on reduced metatarsals, you cannot use a bigger size since the balls of your feet are in a position that is towards the rear end. However, we can often see that the length of the foot is distributed awkwardly or holes for the cleat are not positioned correctly. In such cases, cycling shoes from manufacturer Speedplay are ideal as they offer more options to adjust fore/aft. In extreme cases, a new bolt hole for the cleat can be drilled too.
Cycling shoes should offer enough arch support too, given that they fit well. This is important because there is no scope for the rider’s feet to drop off the arch while cycling. So it becomes crucial to offer support for the rider’s feet as they are in a neutral zone. Custom footbeds can be used in such cases so that the requirement of each and rider can be met.
8. The importance of proper foot placement on the pedals
Since your feet are the direct contact point with your bike so that it can move, how you place your foot on top of the pedals during your rides becomes a key factor too.
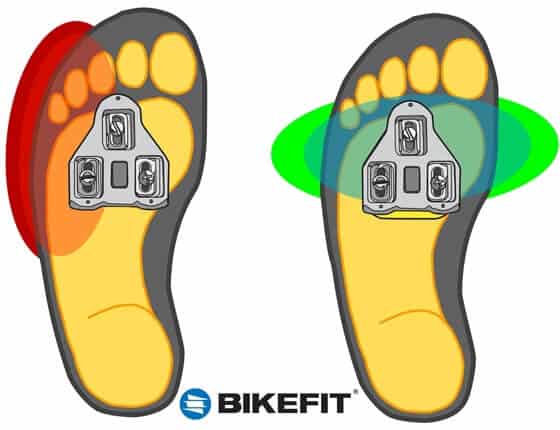
Your foot should be placed such that the metatarsal or ball of the foot is residing on top of the peel’s pivot arm. This will maximize stability as you ride. It is a good idea to practice proper foot positioning on every rise so that you can instantly tell if your feet are not in the correct position. With more of your foot placed on top of the pedal’s body, both efficiency and pedal power are boosted. This position also promotes ankling to how your feet actually roll through the full 360-degree motion of the crank arm. If you are positioned towards the rear end of the pedal, both reach and power are compromised as there is no scope for proper rotation. More towards the front end will put your feet under extended stress minimizing power and resulting in injury/pain.
Credit: Cycling Utah
Frequently Asked Questions
Q1. How can we differentiate between slip-lasted and board-lasted?
Ans.: Climbing shoes with a “last” design refers to the model that the shoe is engulfing. This is why you can see the instep height on shoes, along with a volume for the structure, dimensions for the toe and heel, along the width. Cycling shoes that are used for rock climbing have the slip-lasted design, while only a few shoes are offered board-lasted.
- Slip-lasted: These shoes are used for climbing rocks, so they need to be less sturdy but more sensitive. With no insole, the stiffness is contributed by the midsole – which we can find just on top of the outsole. Here, the upper is sewed to the shoe’s inside – along the midline. This cost-effective version will give the shoe’s insides round profile that is fit snug around the heel.
- Board-lasted: The key difference is in how stiff these shoes are. With increased comfort level, board-lasted shoes can be used throughout the day – which compromises sensitivity. The structure of the shoe uses a ‘board’ beside the base. The sole sides have been sewn so that the shoe is profiled like a box-section. With additional stability and better compatibility with modifications that can be done in-shoe. These shoes also use orthotic insoles and heel-lifts.
Credit: Paul Smith
Q2. How does “shoe last” affect mountain bike shoes?
Ans: A shoe’s “last” also influences climbing shoe shapes. We have provided a breakdown for them below.
- Straight: Straight/flat last offers an increased level of comfort along with a moderate fit. This is perfect for a long duration of uphill travel while climbing cracks too. Also known as neutral shoes.
- Asymmetric: For this shape, the point which is the longest is located just above the big tie so that internally more power is generated, with only one contact point. Such shoes are categorized as aggressive or moderate shoes too – although this will be affected by the downturn.
- Downturned: This final shape of the shoe last is called “cambered”, where the shape can be seen bending in the direction of the toes. If you are into climbing overhanging rocks where the toe and the heel have to be hooked constantly, the asymmetric shape of downturned shoes are perfect for this. Maximum control and performance is certainly a characteristic of shoes that are using cambered shoe last.
Q3. How Should Cycling Shoes Fit?
Ans.: A cycling shoe is “comfortably snug” if fitted properly. A few other factors we should keep in mind are:
- The cup of the heel should be snug as the pedal moves by 360 degrees along the axle. Perfect for locking the heel so that there is no unwanted movement.
- With stepped-up laces, the pressure that is being exerted on the instep is somewhat constant.
- Find some toe room towards the shoe’s front end.
- As the forefoot is held stable there is a minimum chance of pinching.
- The gaps in the upper material of the shoe should not be there at all.
- The ball of your foot needs to be placed on the shoe’s widest part. This allows proper cleat position.
Q4. How tight should cycling shoes be?
Ans.: While your cycling shoes fit tight and close on your feet, you will need to pay attention so that your instep is not put under any extra pressure. Look out for wiggle room so that your big toe is not confined. This should be achieved without making any external adjustments to the shoe structure. If you can reach the shoe’s tow cap – your sizing is wrong and you need to swap it for a larger size. This norm is applicable for cycling indoors too. In ideal circumstances, going in person to buy a bike will let you make a personal choice.
The stability of your forefoot is very important too since manufacturers have designed models with the sole focus on the objective. This will allow you to generate more pedal power, at your convenience. The fact that there will be minimum or no stretching is beneficial. The best cycle shoes will not compress your feet.
Q5. Should my toes touch the end of my cycling shoes?
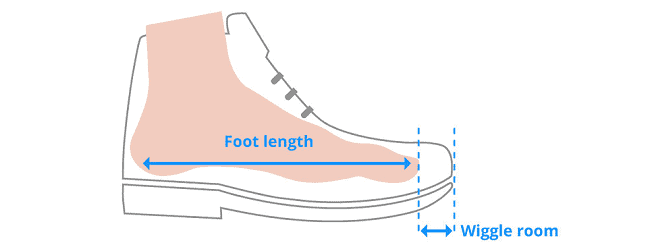
Ans.: Shoes that have been designed for cycling use a different process to determine their length. This process is distinctive to shoes that are used daily or for running., as cycling does not involve any rolling movement. Therefore no surplus space is required at the shoe’s front. If the length of a shoe is above the average size, it is difficult to mount the cleats properly – which would eventually bring down pedaling efficiency. The only part of the front end of a cycling shoe that requires some space is ahead of the big toe. This is why the length of the insole is larger than the actual length of the foot in cycling shoes.
We can use the following to paint a better picture of dimensions seen in a cycling shoe.
Insole length = Foot Length + Space ( 0.5 cm – 1 cm)
Conclusion
Proper fit on your cycling shoes will need a unique balance of comfort, power, and efficiency. Even though the design of cycling shoes is different as per their intended use – it is a popular opinion that all shoes should allow your toes enough room to wiggle slightly. A toe box should have sufficient width for natural toe splay so that limb injuries faced by cyclists that are usually chronic can be avoided. In extreme cases, you can use a surgical scalpel to make some slits that run vertically over the toe box of the shoes. There will be more room for the toe box to undergo expansion.
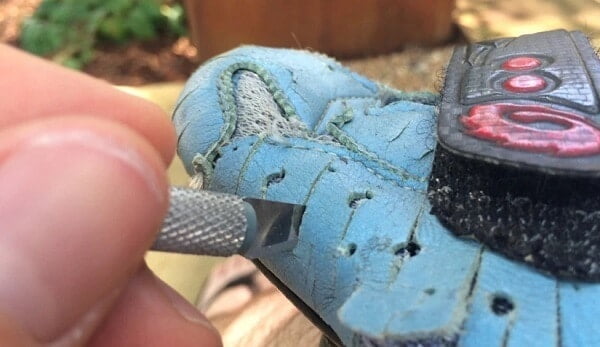
Photo credit: Natural Footgear
Interesting. If making slits/cutting or modifying shoes to create more space for odd shaped areas, eg. bunions. Do you advise just make a slit and leaving it, or going to a cobbler to patch the hole with something elastic, or personal preference.
Also, for modifying or stretching do you advise any tools/techniques, or again, best go to a cobbler?