
If you want to get the most from your saddle, you have to focus on three important factors:
- Choosing the right saddle depending on your riding styles, bike types, budget, and personal preferences
- Choose the right-size saddles based on your sitting postures and body flexibility
- And the third one is fitting your saddle accurately
Don’t always blame your saddle for the sources of pain, discomfort, and saddle soreness. If a proper saddle is not fitted correctly, the consequences will be saddle sore and discomfort even leaving cycling forever.
In this article, I will give you a complete guideline on how to fit your saddle perfectly. If you have any opinion or feedback on this article, input it in the comment section.
Step 1. Get your accurate saddle height
The first and foremost thing is to adjust your saddle height. When you buy a new cycle and not feeling comfortable like how you thought of, then you should first check whether your saddle is set at the right height.
Wrong saddle height gives birth to the following consequences:
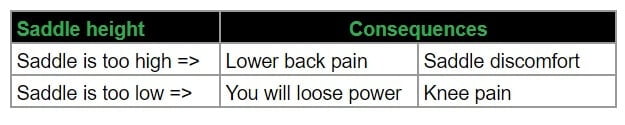
➥ To reduce lower back pain, have a look at our article for Best Bikes for Lower Back Pain and, to reduce knee pain, you can also have a look at our selections for Best Stationary Bikes for Bad Knee.
There might be a lot of methods, but we are concentrating on the following 3 methods.
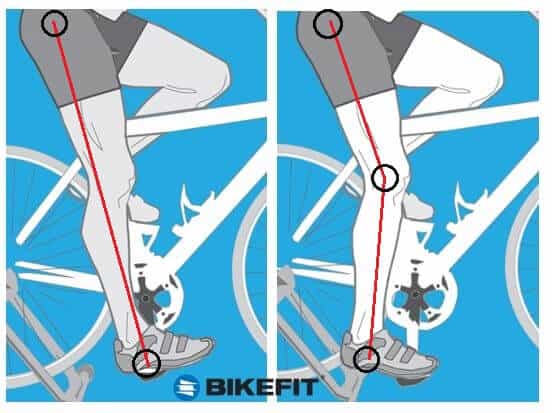
A. The “Heel” method
This one is the most simple and quick method to find the right height of your saddle. At the same time, it is also the least accurate method. Please follow the steps accordingly:
- Stand next to your bike and raise the saddle level up to your hip.
- Sit on your saddle and put your heel on the center of the pedal making sure that the crank arm is pointed downwards and it is in the same line as the bottom seat tube.
- Extend your leg while sitting on the saddle. If you can easily extend your leg then you have found the correct saddle height.
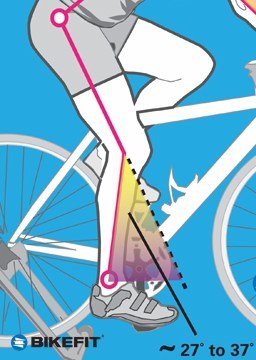
B. The Holmes method
A modern method to find the correct height of your saddle. It requires a smartphone but of course, I believe everyone does have one in this generation. Follow the steps accordingly:
- Mount your bike on a turbo trainer and ask one of your friends to film you with his/her smartphone or video camera.
- Ride slowly and swiftly for a moment.
- Stop the recording at the right moment, this is very important.
- Pause the moment where your pedal is in the lowest position while watching the recording.
- With the help of a set square start measuring.
- If the angle you measure is greater than 37° then you need to raise your saddle and if it is smaller than 27° then lower your saddle a little bit.
- That is it, you have found the correct height for your saddle.
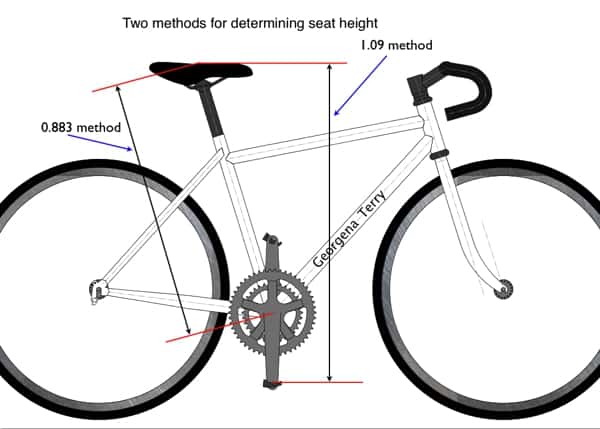
C. The 109% method
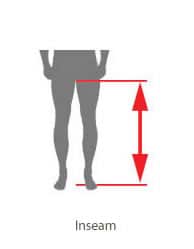
Step 1: Inseam measurement
In this way, your first to-do is to measure your inseam. Measuring your inseam is easy. It is the distance of your crotch from the ground while you’re standing straight on the ground (barefooted). Here is my shortcut way to get your inseam. Follow these steps:
- Without your cycling shoe stand next to a wall.
- Place something solid like a book or metal scale between your legs.
- Mark the height of the top of the book on the wall with a pencil or pen.
- Calculate the distance in centimeters instead of inches from the floor to the marked point. This is basically your inseam height.
Step 2: 109% method
Now multiply the inseam length by 1.09 to get the perfect saddle height from the pedal platform (while pedals are at the vertical position). 109% method is a comparatively more accurate method.
There is another way to get the perfect saddle height.
The distance from the center of the bottom bracket to the top of the saddle = Inseam length x 0.883
Take a look at the following image. It shows both methods.
Step 2. Find correct bike saddle angle
The saddle angle is the easiest problem to fix. Depending on your riding style tilt your saddle downward or upward. This should give you an idea about the comfort level you are looking for.
As a starting point, your saddle should be leveled, with the back and the front nose at the same height (A flat saddle with a 0° angle). For most of the riding positions i.e. Relaxed (90° riding position best for city or heavy-duty type tours), Inclined (60° riding position best for touring and trekking) and Athletic (45° riding position best for performance type riding), a completely flat saddle or slightly tilted downward at the front of the saddle is preferable.
If you are not comfortable with this, try lowering the front nose of the saddle a little. But don’t lower it too much as you haven’t sat on the saddle yet. Your pressure will lower it down more. As a result, you may slide forward off it. It is ideal not to tilt the front nose in a more upward position. This can lead to serious back pain.
Saddle angle changes over time
Okay, first talk about the basics of saddle tilting. Saddle tilting is not a static thing, you cannot measure your saddle angle in a static way. If we center the saddle level and then sit on it, our body will produce pressure on the saddle. So the saddle may not be leveled anymore. Eventually, the overall flex of the seat posts, the rails, and the shell of the saddle will combine to create a saddle position that is a little more nose-up or a little more-nose down. In general, if you nosed down your saddle more than average or more than the particular saddle was intending to do, there are things that are more likely to happen which you will find unappealing. First of all, It will create pain in your pelvic area, your hands have to deal with a certain amount of pressure. You have to support yourself with your upper torso most. So potentially there is a possibility that having more weight on the hands may lead to issues with hand numbness.
What Professionals Do
The pro cyclists tend to bend their saddles a little bit down (Almost 9°). The saddle is usually slid all the way forward as far as their allowed to under the rules and the front end is dropped more aggressively than normal. So why are they doing this now? – It is because the rule has changed.
A couple of years ago there was a new rule from the UCI (Union Cycliste Internationale) for cyclists about the tilting of the saddle:
“The plane passing through the highest points at the front and rear of the saddle can have a maximum angle of nine degrees from horizontal. The length of the saddle shall be 24 cm minimum and 30 cm maximum. A tolerance of 5 mm is allowed.”

This decision allowed riders more flexibility in setting up their bikes. Now the riders can take advantage of this as they can point their pelvis a little bit forward which helps them to straighten their spine, their backs are now more flat allowing them to be more aerodynamic which helps them to reach their comparatively low handlebars much easier.
Step 3. The fore/aft position (layback): How to sit on the saddle correctly
We are going to discuss two methods here. One is the KOPS method which is very popular. And the other one we are going to discuss is The Balance Point Fore/Aft Position.
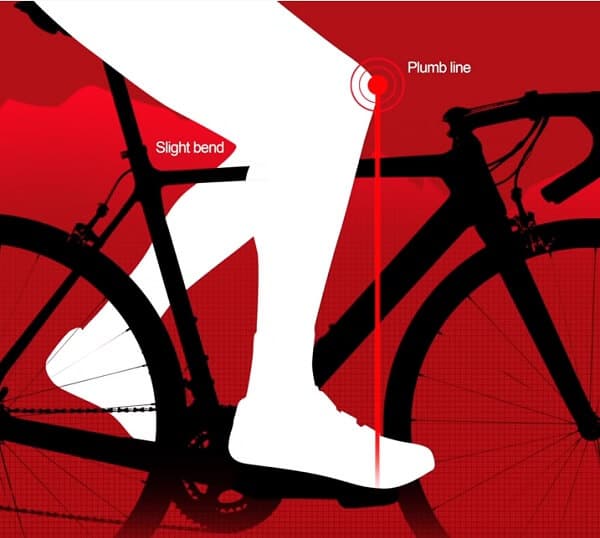
A. The KOPS (Knee Over Pedal Spindle) Method
KOPS is the most accepted and renowned method to get the perfect position of your bike saddle. it is an age-old technique for adjusting the saddle fore/apt position.
The following image shows how this method works. What you will have to do is: drop a plumb line from the front of your knee cap and the plumb line will drop just in front of the pedal axle.
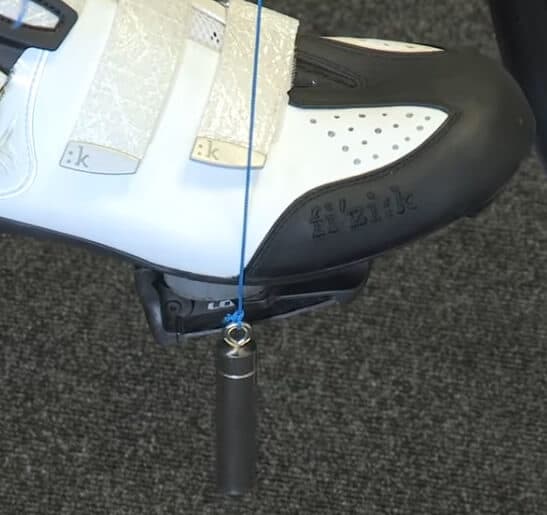
Here is another image to help you understand more the concept.
Limitations of the KOPS method:
The knee over the pedal spindle method is simple and easy. But it does not take into account different body shapes, rider’s flexibility, and their pedaling style. In my opinion, the method is popular because it is coincidental but not functional.
First of all it just so happens for most of the road bikes with typical seat tubes of 72-74°. But for time trial bike or triathlon bike, where the rider’s knee can be sometimes in many angles and the tube angles are more aggressive or relaxed, this method is not accurate for these types of bikes.
Although the KOPS method has been known to many people and still the preferred choice for most it is unfortunate to say that it is not that reliable. The plumb bob can be held from any of the following places on the leg for the KOPS method:
- From the front of the Kneecap
- From the front of the Patellar Tendon
- From the Tibial Tuberosity
- From the Center of Rotation of the Knee
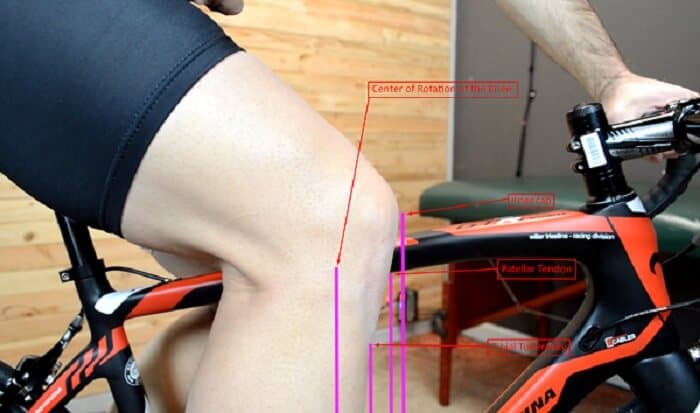
Most of the time people say from the front of the knee the plumb line should be but there is not much agreement on where on your knee you are supposed to drop that plumb line. This is not accurate at all. The center of rotation of your kneecap should be the most righteous place but I don’t know, it’s up to you whether you go for the method or not.
B. The Balance Point Fore/Aft Position Method
Because of the immutability of KOPS, I have come to present you with this method. This test is best done when your bike saddle is almost close to perfect.
First, the bike should be mounted by a trainer. The tester should pedal in a moderate way (approximately 80% of the maximum effort) which you can maintain for almost an hour. When you are warmed up sufficiently, ask your friend to do you a favor. Tell your friend to stand in front of the cycle and you start pedaling. While pedaling at an average speed try to slowly raise both of your arms off the handlebar at the same time and sit up straight. Please, do not push off the handlebars or use momentum in order to do this. Check if you can balance yourself at the point. If you are unable to do so and fall forward then ask your friend to catch you.
These are the positive impacts that you will find for this test:
- Your cadence for cycling will increase.
- Tightens your abdominal tissues and muscles.
- Finally, your hips will slide forward when you will be trying to put your hands back on the handlebar.
So your saddle height, saddle angle, and the distance between your saddle and handlebar, when you perfectly complete the test you should probably find your perfect fore/aft position.
If you are experiencing hand numbness, saddle discomfort, neck pain, and low back pain, then the effectiveness of this method will be decaying.
Signs That You Are Sitting Too Far Back
You are going to produce huge power over the flats and inclines when your saddle is set too far back. But the power will not remain when the roads go upwards like fully straight then you will barely have any weight on the pedals and you will feel the importance of standing up and continue pedaling because you need more weight to put on the pedals. Additionally, a high cadence will be hard to maintain when the saddle is too far back. You experience back knee pain from time to time.
Signs That You Are Sitting Too Far Forward
Your upper body will be responsible for balancing when your saddle is set too far forward. This will put much pressure on your abdominal muscles for tensioning. The tension will pass through the shoulders and arms and eventually causing hand soreness. Although a quicker cadence can be maintained for fully straight climbs you need to sit back. Moreover, you will put too much pressure on your upper torso leaving less time to relax and breathe properly. This will waste a lot of your valuable energy. You will more likely to experience front knee pain from time to time.
Step 4. Rider’s distance from the handlebar (handlebar reach)
On a road bike, there are three areas of the handlebar where a rider takes his/her grips. They are:
- The tops
- The hoods
- The drops
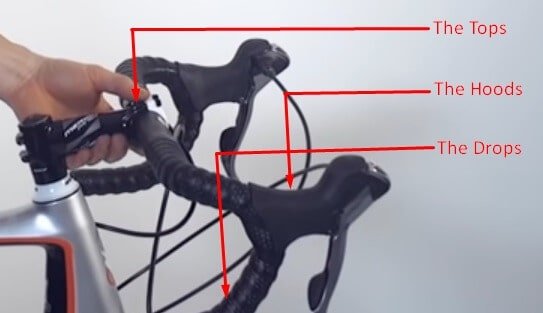
If you are able to reach all three areas with equal comfort, then you know that you successfully manage to adjust your handlebar reach.
There is a common misconception that you can adjust your handlebar reach by moving your saddle forward or backward. But as the saddle height and lay-back (fore/apt position) is set for optimum pedal efficiency, we do not want to move our saddle placement. Rather we should consider adjusting the stem height and handlebar leaving the saddle position where it is.
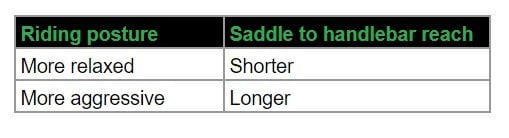
Moving your stem up & down
Fundamentally for a more relaxed position, a shorter reach from the handlebar to the saddle is preferable. Again for aerodynamic performance, the distance between the handlebar and the saddle should be relatively long.
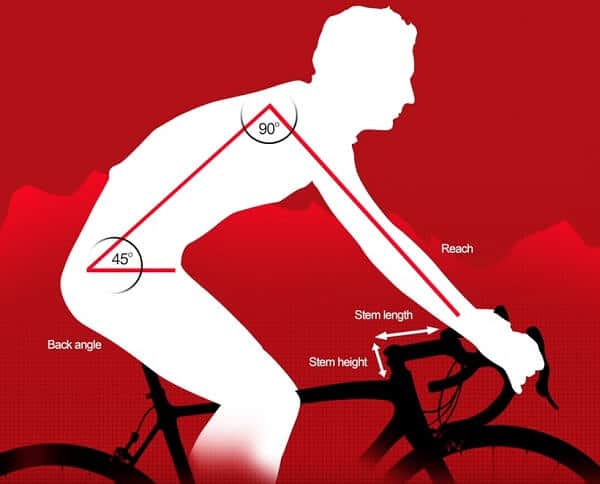
In general, while cycling the angle of your back should be 45° (with the ground) and the angle between your neck and your arms should be 90°. This will give you the best blend of comfort, aerodynamics as well as power. Now you should remember, we are only talking about the angles when considering that you are wearing your casual cycling shorts.
In reality, the way you can adjust your handlebar reach is: adjusting the height of your stem. By just moving your stem 2-4 centimeters up or down, we can get the optimum handlebar reach. It is a good option when you are buying a cycle from an eminent bike shop, they will adjust the handlebar height for you.
You can also use your cubit measurement which is the measurement between your elbows to your fingertips. For any normal bicycle, the distance between your saddle nose to the back of the handlebar should be equal to your cubit measurement which is basically 100 mm. This will provide you an athletic fit. 80 mm handlebar reach should work for commuting.
Position of the Brake Levers
When you find the right distance between your bike saddle and the handlebar then it is wise to check that the brake levers should easily fall into the reach of you when your hand is in the natural position that is when you have a straight line all the way from your fingers to your elbow. Remember you do not need to move your hands upwards or downwards to access the brake levers. Once you have them in the correct position tighten them down with a torque wrench. Adjust the other side in the same way.
Unable to reach the Drops Comfortably
If you cannot extend your reach for putting your hands on the drops unconditionally, then it is possible that you have reached more than enough than your normal riding position. Our suggestions are-
- For compensation, rather than moving your saddle, change your stem length.
- Maintain a 90° flexion from your upper torso to your arms.
- It would be wise not to keep straight arms. It will be the reason for discomfort and possible injury.
- Check if your back is at a 45° angle from the top tube.
- Judging by your riding style choose how you want to bend your back, do not push yourself.
Check this video from 1:30 to get a complete idea of adjusting the handlebar reach.
Conclusion
I touched everything you need to know about perfect bike saddle fitting. If you select the perfect saddle with the accurate size and fit your saddle in the above-mentioned ways, you will get the most from cycling.
➥ Read more on this saddle height topic: Comparison between Mountain Bike vs Road Seat Height.
I read wih interest the balance method for seat setback, but the “positive impacts” you list are all the problems I have, which are putting too much weight on my hands and wrists. I went to a bike fitter a couple years ago who raised my seat very high and tilted the nose down, which started my numb hands and chronic wrist pain. Of course I have since reversed the bike fitter’s adjustments, but too late for my wrists. I’ve tried every conceivable position (seat high/low and back/forward) and still have to push myself back unless I am pedalling very hard. Seat is level. Thanks for any suggestions.
Hi Don,
Thanks for sharing your pains and sorrows with bike fitting. No doubt it is a very complex thing and very specific to the rider’s condition.
Best regards
What sort of cubits are you referring to?
Real-world cubits aren’t 100 mm!
E.g.
An ancient unit of linear measure, originally equal to the length of the forearm from the tip of the middle finger to the elbow, or about 17 to 22 inches (43 to 56 centimeters).
That’s 430 to 560 mm!